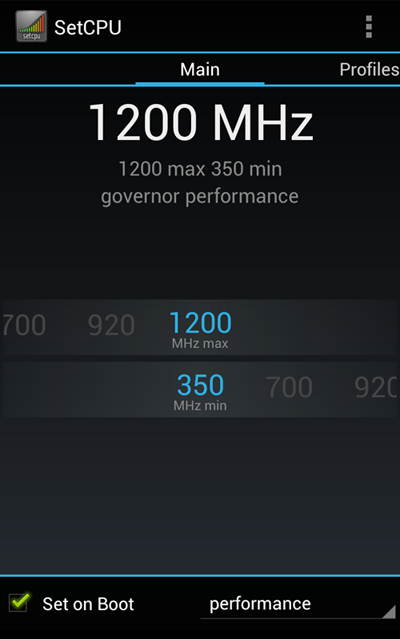
Getting Started with SetCPU

Setup

Welcome to SetCPU! This guide covers most of the features available in SetCPU. Getting started with SetCPU is easy. The first time you start SetCPU, you'll be greeted with an introduction message. Read it and and press the Continue button below. If you have Superuser installed, which comes with most root methods, SetCPU will now ask for root permissions now. Just press Allow button in the Superuser dialog to give SetCPU root permissions. The next time you start SetCPU, you'll jump right to the Main tab.

On the Main tab, you can quickly change your most important CPU settings. Slide or tap the two rows of numbers to change your maximum and minimum CPU speed. Try bringing the max slider one notch lower. You'll notice the display at the top change accordingly.

If SetCPU tells you that your device doesn't have root permissions, there may be an issue with the way root is configured on your device. Try checking the Superuser app to make sure SetCPU has root permissions, or try another root method. If you haven't rooted your device, check out the various resources available online for rooting your device – it varies depending on your software and what device you have. If SetCPU can't gain root permissions, you won't be able to use most of the tabs, but most of the features of the Info tab will still work.

SetCPU Tabs

Main

The Main tab allows you to view and quickly change your most important CPU settings. The max and min sliders control the maximum and minimum CPU speed that your device will reach. Tap or slide the sliders to change the max and min settings.

On the bottom right, you can set the CPU governor. The governor controls your phone's behavior when choosing speeds between the max and min. The available governors vary from device to device and kernel to kernel. The interactive and ondemand governors, for example, will scale your CPU up to the max setting when the CPU usage is high, and bring it back down when it's lower. For a full list of common governors, see the section on the Governor tab below.

The text at the very top of the menu shows the current CPU settings. This may not always match the sliders or the CPU governor selector. The large CPU frequency display will change based on your selected governor and CPU load.

The Set on Boot checkbox allows SetCPU to set the Main tab settings when your device first boots, so you won't have to go back into SetCPU every time you reboot. The Set on Boot checkbox also starts the profiles service if profiles are enabled.

Accessing the menu here will bring up a few options. If you're going to be overclocking or changing voltage settings, it's recommended that you read the Safe Mode instructions. The Perflock Disabler option helps SetCPU work on certain HTC stock kernels. Finally, you can also return to the introduction screen of SetCPU here.

  • SetCPU's main tab


Profiles

The Profiles tab, which is located to the right of the Main tab, allows you to customize the CPU settings based on events that happen to your device. For example, a very popular profile is to set the max CPU speed lower when the battery is under 50% capacity to save battery. To get started with profiles, check the Enable checkbox at the bottom and press the Add button at the top right of the Profiles tab. This launches the Edit Profile menu.

The Profiles tab lists the current saved profiles on your device. To enable and disable profiles, use the checkbox on the left. The Notifications checkbox gives you notifications in the Android status bar of which profile is currently active.

Each profile has a certain condition. This is what triggers the profile; that is, what must happen for SetCPU to set the profile. Conditions allow you to set up battery level, charging, screen off, in–call, and time profiles. You can change the condition at the top of the Edit Profile menu.

Each profile also has a priority option. Priority is how SetCPU decides between two or more profiles when multiple conditions are met. For example, if you have two profiles, one with a charging condition and one with a screen off condition, and your phone's screen is off and charging at the same time, the profile with the higher priority will be set. For priorities, exact numbers don't matter – just make sure the order is right. To see some examples of how priorities should be used, see the Example Profiles section below.

If no conditions are met, no profiles are active. SetCPU will revert to your last saved settings in the Main tab. This is also known as the Main profile if notifications are turned on.

Charging Condition

Setting a charging condition means this profile will only trigger when the device is charging. There are three charging conditions which may or may not apply to your device – Charging All, Charging AC, and Charging USB. Charging All is called whenever the device is plugged in, whether to a wall socket or a USB port. Charging AC is only called when the device is plugged into a wall socket, and Charging USB is only called when the device is plugged into a USB port. Some tablets will only charge using a wall socket, so keep this in mind.

Screen Off Condition

This profile will be active when the device's screen is turned off, and will be inactive when the device's screen is turned back on. Use it to limit the CPU speed when you're not using the device to save battery.

Battery Condition

This profile will trigger when the battery level is under a certain point. A slider will pop up with a battery percentage on it. Set the battery level to the level you want it to be.

Temperature Condition

This profile will trigger when your device's internal temperature sensor goes above a certain point. Set your desired temperature using the slider.

Time Condition

The time condition allows you to set certain CPU settings for a time of day. For example, this profile will only be active for the hour between 12:00 PM and 1:00 PM if the time span is set to 12:00 PM – 1:00 PM (ie. 12:00 – 13:00).

In-call Condition

This condition will trigger whenever you are in a call.

The Profiles tab also has menu options for backing up, restoring, and sharing profile settings. If you choose to back up your profiles, they will be saved with an automatic name on your internal storage. The Restore menu also looks on the root directory of your internal storage.

  • SetCPU's profiles tab
  • Profile edit menu, editing a battery condition profile


Example Profiles

Here are some example profiles for you to try out. The available governors and CPU speeds will vary from device to device, so you probably won't have the same numbers shown here.

Charging and Screen Off Profiles

Since battery life often doesn't matter when your device is plugged in, the Charging profile is very popular. This configuration sets the CPU speed to max when your device is plugged in, and then back to normal when you unplug your device. Likewise, the Screen Off profile is also popular, since performance doesn't really matter when your phone's screen is off.

Screen Off
800 max
200 min
interactive
priority 60

Charging All
1200 max
1200 min
performance
priority 50

In this example, the Screen Off profile has a higher priority than the Charging profile. This means that if the device's screeen is off and it's also charging at the same time, the Screen Off profile will take priority and be set instead of the Charging profile.

Two Battery Profiles

This profile setup will lower your max CPU speed when the battery capacity is under 50%, and again when the battery capacity is under 20%. Notice that the Battery < 20% profile has a higher priority than the Battery < 50% profile – the exact numbers don't matter. The priority of the lower battery profile just has to be higher.

Battery < 20%
400 max
200 min
interactive
priority 40

Battery < 50%
800 max
200 min
interactive
priority 30

Putting It Together

This profile setup combines the above two setups. It puts the battery profiles at lower priorities than the other profiles, but otherwise leaves everything else the same. When the device is unplugged and the the screen is on, SetCPU will use the battery profiles. Otherwise, it'll use the other two profiles, because they have higher priorites.

Screen Off
800 max
200 min
interactive
priority 60

Charging All
1200 max
1200 min
performance
priority 50

Battery < 20%
400 max
200 min
interactive
priority 40

Battery < 50%
800 max
200 min
interactive
priority 30


Governor

The Governor tab is an advanced menu that allows you to make changes to the behavior of certain goverors. If the currently selected governor is compatible with this menu, you'll see a list of tweakable options here. Check the Set on Boot box here to set these changes on boot, and the Set with Profiles box to set these changes, which are ordinarily reset, when the profile is switched. Some governors, like performance and powersave, do not have any options that can be changed with the Governor tab. If this happens, the tab will be disabled.

Here is a list of common governors. Many custom kernels have customized governors written by the community. For explanations of these, please contact the kernel's distributor.

  • ondemand: Available in most kernels, and the default governor in many kernels. When the CPU load reaches a certain point (the up threshold), ondemand will rapidly scale the CPU up to meet demand, then gradually scale the CPU down when it isn't needed.
  • interactive: Available in many kernels, and becoming the default scaling option in most official Android kernels. The interactive governor is functionally similar to the ondemand governor with an even greater focus on responsiveness.
  • conservative: Available in some kernels. It is similar to the ondemand governor, but will scale the CPU up more gradually to better fit demand. Conservative provides a less responsive experience than ondemand, but can save battery.
  • performance: Available in most kernels. It will keep the CPU running at the max set value at all times. This is very slightly more efficient than simply setting max and min to the same value and using ondemand.
  • powersave: Available in some kernels. It will keep the CPU running at the min set value at all times.
  • hotplug: Available with some multi–core systems. Similar to ondemand, but turns additional cores off when they're not being used.
  • userspace: Used with a method for controlling the CPU speed that isn't used by SetCPU. Do not select the userspace governor.
  • smartass: Included in some custom kernels. The smartass governor effectively gives the phone an automatic Screen Off profile, keeping speeds at a minimum when the phone is idle.
  • SetCPU's Governor tab showing the 'conservative' governor settings


Voltages

The Voltages tab is only available with some custom kernels and devices. If the Voltages tab is available, it will automatically show up between the Governor and Profiles tabs. Otherwise, the Voltages tab is unavailable. The Voltages tab is an advanced feature that allows you to customize the voltage of each available CPU frequency of your device (usually called undervolting). The voltages that your phone ships with are usually slightly higher than needed. Since power consumption decreases quadratically with voltage, even slightly lower voltages can mean drastically lower power consumption, but that sometimes comes at the cost of device stability. The limits for stability vary from chip to chip, even across the same device, so your results with this menu will vary.

The Voltages tab will show a list of all the available CPU frequencies on your device and a corresponding voltage for all of them. To change the voltage at a certain frequency, tap the frequency's entry in the list, and use either the text box or slider to change the voltage. Click on the Apply button on the top right to save the voltages and try the new voltage out. When trying out new voltages, go down a very little amount at a time and apply the voltages. Stress test your device at the new frequency and voltage for some time before moving on to a lower voltage. If your device crashes, the voltage is probably not stable. Reboot your device and try again. Don't check the Set on Boot box before you're sure that the voltage set you've saved is stable!

The Voltage tab has the potential to be dangerous, since higher voltages mean that the CPU will produce more heat. You almost never want to raise the voltage above the default at any frequency. Most of the time, unstable voltages will just crash the device, but use it with caution!

If you access the menu in this tab, you can choose to back up, restore, and share voltage settings, like you can with profiles. They will be saved to the internal storage or SD card. There is also an option to restore all the voltages to the kernel's default. Reboot your phone to complete this operation.

  • SetCPU's voltages tab on a Nexus S running CM7


Info

The Info tab allows you to view information about your kernel, CPU, battery, phone, and memory status. It also includes a few benchmarks for testing the speed of the phone.

You can find the benchmark options in the menu at the bottom. The lower the benchmark score, the faster the phone is running. Keep in mind that the score from the short and long benchmarks can only be used to accurately compare different frequencies across the same ROM and kernel. The score may fluctuate between runs due to interference by background processes. For the best results, use the performance governor or set the max and min to be the same. There is also a stress test function. Stress testing allows you to test the stability of voltage settings or higher overclocks. The stress test will stress your CPU, pushing it to its thermal limits. The phone may be somewhat unresponsive during this time. The stress test will continue forever, so you have to manually end it after some time. To do this, simply press the back button on the phone. The stress test may end by itself if your phone is especially unstable, however.

To copy the current system info menu to the clipboard, press the copy button on the top right. There's also a share button.

  • SetCPU's Time in State info window

Other Settings

Safe Mode

If you're trying out new CPU speeds on an overclocked kernel or trying out new voltage settings, it's always a good idea to uncheck the Set on Boot checkboxes in the corresponding menus before doing so. This way, your phone will not boot loop if you get stuck on an unstable CPU frequency or voltage. To be safe, you can extract a Safe Mode update.zip to your SD card in the Main tab. Access the menu here, and press Safe Mode Instructions to do this. Flash the setcpu_safemode_toggle.zip file in recovery mode as a normal update.zip to recover if SetCPU causes your device to boot loop. Flash the zip again to toggle safe mode off. Alternatively, you can make a file called setcpu_safemode with no extension and place it on your SD card or internal storage, /data, or /data/local to active safe mode.

If you didn't get a chance to extract the safe mode zip, download the safe mode update.zip here. Flash it in recovery mode just like any other update.zip.


Custom Setup

In rare situations and on older kernels, SetCPU may not be able to automatically detect the full range of speeds supported by the kernel. If this is the case, you can configure SetCPU to use custom frequencies. To get started, you'll need the list of frequencies your kernel can support in kHz (not MHz!).

Create a plain text file and sort the frequencies on one line by comma, from lowest to highest. For example, the following is a valid config file:

125000,250000,500000,550000,600000

To store the custom frequency list on your phone, save it as setcpu with no extension and put it in /data/local. Or, save it as setcpu.txt and put it on your SD card or internal storage. SetCPU reads from the SD card or internal storage first and uses that text file if present, then tries to read from /data/local.

To configure SetCPU to read your custom frequencies, go back to the device selection screen (in the Main tab, access the menu and press Device Selection), choose Advanced Setup if necessary, and pick the custom config option at the very bottom.


Perflock Disabler

On most stock HTC kernels and some custom kernels, HTC has enabled a driver called perflock that constantly resets SetCPU's Max and Min settings. This does not apply to Google Experience HTC devices such as the T-Mobile G1, the myTouch 3G, any Google development device, or the Nexus One. It does, however, apply to HTC Sense devices.

SetCPU can disable perflock on most HTC kernels, giving you control of the Max and Min settings of the CPU. To do this, access the menu in the Main tab and choose Disable Perflock. Read through the notice and then press the button in the dialog. If successful, you should be able to change the frequency with SetCPU. If this process fails, please e-mail the developer with your kernel version and device so support can be added.

Keep in mind that disabling perflock does not enable overclocking, though some overclocked kernels may require perflock to be disabled. Overclocking, in most cases, requires a custom kernel.


Changelog

SetCPU has been updated frequently for over three years. Here are some of the latest updates.

2.3.0.2 (Latest): Fix widget to now only take up 1x1. Fixed a bug where profile notifications were not taking the user back to the app. Fixed a bug that caused Superuser to give excessive notifications on some multicore devices. Fixed a crash where SetCPU crashed when given some non-supported voltage interfaces - the menu should be present, but non-functional on these devices. Support for more voltage interfaces coming soon.

2.3.0.1: Fixed a major issue with custom frequencies. Sorry about that!

2.3.0: All new interface featuring a new frequency slider. Tap or slide your finger across the slider to quickly switch CPU speeds. Added an Action Bar and implemented View Pager navigation, revamping the entire interface around the new Android design guidelines. Dropped the dual pane info menu and added simpler Action Bar-based navigation. Changed all references to "scaling" to "governor." Added a new governor menu (previously "Advanced") that supports more governors and supports persisting when switching profiles. Improved support for some multicore systems and tablets. Dropped support for Android SDK versions Android 2.0.1 and below. Removed jargon from some descriptions and explanations. Numerous minor bug fixes and interface enhancements. Perflock disabler update coming soon.

2.2.4: Improved support for the new MSM 8x60 devices (such as the HTC EVO 3D and Sensation).

2.2.0: Added an "In Call" profile. Improved the Set on Boot safemode function by including a flashable zip that toggles SetCPU's safemode. Press menu on the main tab for more details. Added autodetect support for all Tegra 2 fakeShmoo kernels (ie. G2x). Added a "Voltage" tab for undervolting the CPU on fakeShmoo kernels, some custom Galaxy S kernels, and some Nexus S kernels. This is a full-fledged interface for undervolting these devices, and includes backing up and restoring and a Set on Boot checkbox. Improved the way SetCPU initially requests root. Various miscellaneous bugfixes.